If you’ve ever typed something into an AI image generator and received a blurry, distorted mess with six fingers and two left eyes, you’re not alone. Most beginners struggle not because the tools are bad, but because realistic AI image generation is a skill — and like any skill, it has a learning curve.
The good news: modern AI image generators have improved dramatically. Tools like Midjourney v6, FLUX, and ChatGPT Images now produce outputs that can genuinely fool the eye. The difference between a forgettable image and a stunning photorealistic result usually comes down to how you write your prompt and which settings you apply.
This guide walks you through exactly how to generate realistic AI images, step by step — from choosing the right tool to writing prompts that consistently produce high-quality results.
Quick Summary
What are realistic AI images? AI-generated visuals that closely mimic real photographs, including accurate lighting, textures, skin detail, and perspective.
Best tools: Midjourney (quality), FLUX (open-source control), ChatGPT Images (ease of use), Adobe Firefly (commercial safety), Leonardo AI (flexibility).
Best prompting strategy: Subject + Environment + Lighting + Camera + Style + Quality modifiers + Negative prompt.
Biggest mistakes: Vague prompts, ignoring negative prompts, wrong aspect ratio, inconsistent styles.
Fast recommendation: Beginners should start with ChatGPT Images or Adobe Firefly. Advanced users get more control from Midjourney or FLUX.
What Are Realistic AI Images?
Realistic AI images are computer-generated visuals created from text descriptions that are designed to closely resemble actual photographs. Unlike stylized AI art, which may look painterly or illustrative, photorealistic AI images aim to replicate the qualities of a real camera: depth of field, natural skin texture, accurate shadows, and believable lighting.
These images are produced by text-to-image AI systems built on diffusion models. A diffusion model is a type of neural network trained on billions of image-text pairs. During training, it learns how images and descriptions relate to each other. At inference time, it starts from random noise and gradually “denoises” it into a coherent image that matches your prompt.
The key difference: a standard AI illustration looks generated. A photorealistic AI image looks photographed. The gap between the two is closed through prompt engineering, quality modifiers, and choosing the right model.
How AI Image Generation Works
Understanding the basic workflow helps you prompt better.
- You write a prompt. A text description that tells the model what to create.
- The model interprets the prompt. It matches your words to patterns it learned during training.
- Diffusion begins. The model starts from a field of random noise and iteratively refines it toward an image that matches your description.
- Rendering completes. After dozens of denoising steps, a final image emerges.
- You refine. You adjust the prompt, add negative prompts, change parameters, and regenerate until the output meets your standard.
The quality of step one determines everything that follows. A weak prompt produces weak images regardless of how good the model is.
Best AI Image Generators for Realistic Images
| Tool | Best For | Strengths | Weaknesses | Free Plan |
| ChatGPT Images (DALL·E) | Beginners, quick results | Easy to use, natural language, integrated with ChatGPT | Less fine-grained control | Yes (limited) |
| Midjourney | Professional quality | Industry-leading photorealism, consistent style | No free tier currently, Discord-based | No |
| FLUX (Black Forest Labs) | Technical users, open-source | Excellent realism, highly controllable | Requires setup or API | Yes (via some platforms) |
| Stable Diffusion | Advanced users | Fully customizable, local use, extensive model library | Steep learning curve, hardware-intensive | Yes (self-hosted) |
| Adobe Firefly | Commercial use | Commercially safe, integrates with Creative Cloud | More conservative outputs | Yes (limited) |
| Leonardo AI | Creators and marketers | Versatile, strong realism controls, easy UI | Free tier limitations | Yes |
| Ideogram | Text in images | Best-in-class text rendering | Less strong on complex scenes | Yes |
Step-by-Step Guide to Generating Realistic AI Images
Step 1: Choose the Right AI Image Generator
Your choice of tool depends on your use case and technical comfort level.
Beginners should start with ChatGPT Images or Adobe Firefly. Both accept natural language prompts and require no technical setup. Adobe Firefly is particularly useful if your images will be used commercially, as it is trained on licensed content.
Content creators and marketers get strong results from Leonardo AI or Midjourney. Midjourney consistently produces the most visually polished outputs but requires a paid subscription.
Designers and power users benefit most from FLUX or Stable Diffusion, which offer deeper control over model weights, LoRA fine-tuning, and custom pipelines.
Best for: If you are new to AI image generation, start with ChatGPT Images. If you want the best photorealism and are willing to pay, use Midjourney.
Step 2: Write an Effective Prompt
The prompt is your primary tool for controlling the output. A well-structured prompt includes these components:
Subject: What or who is in the image. Be specific about age, expression, clothing, and positioning.
Environment: The setting, background, and surroundings.
Camera: The type of camera, lens, and perspective you want to simulate.
Lighting: The type and direction of light.
Composition: How the subject is framed (close-up, wide shot, rule of thirds).
Style: The visual mood or photographic style.
Quality modifiers: Terms that signal high-quality, professional output.
Example prompt (portrait):
“Portrait of a 35-year-old woman with brown eyes and freckles, standing near a window in a modern apartment, soft natural morning light, Canon EOS R5, 85mm f/1.4 lens, shallow depth of field, photorealistic, ultra-detailed skin texture, shot on RAW”
Example prompt (product photography):
“A glass bottle of olive oil on a white marble surface, olive branch beside it, studio lighting with soft shadows, top-down angle, commercial product photography, 4K, ultra-sharp”
Step 3: Add Realism Modifiers
Realism modifiers are specific keywords that tell the model to replicate the look and feel of professional photography.
The most effective realism modifiers to include:
- DSLR or shot on DSLR — implies professional camera quality
- RAW photo — suggests an unprocessed, detailed photographic look
- cinematic lighting — produces dramatic, well-composed light and shadow
- depth of field — creates natural background blur (bokeh)
- focal length: 85mm — simulates a flattering portrait lens
- volumetric lighting — adds atmospheric light rays and depth
- realistic skin texture — important for portrait work
- photorealistic — general-purpose realism signal
- hyperrealistic — pushes toward extreme detail
- 8K, ultra-detailed — signals maximum quality
Include three to five of these modifiers per prompt. Stacking too many can confuse the model; aim for the most relevant ones for your scene type.
Step 4: Use Negative Prompts
A negative prompt tells the model what to exclude from the image. This is one of the most underused and most powerful tools for improving realism.
Without negative prompts, AI models often default to common artifacts: cartoonish features, distorted hands, blurry faces, or oversaturated colors.
Effective negative prompts for photorealism:
“cartoon, painting, illustration, drawing, anime, 3D render, blurry, low quality, distorted face, extra fingers, deformed hands, unrealistic, watermark, text, signature, oversaturated”
In tools like Stable Diffusion and Leonardo AI, you enter negative prompts in a dedicated field. In ChatGPT Images or Midjourney, you can include them by appending “avoid: [elements]” or using the –no parameter (Midjourney specific).
Step 5: Generate Multiple Variations
Never rely on a single generation. AI image generation is probabilistic, meaning the same prompt produces different results each time. Generate four to eight variations per prompt, then select the best candidate.
This is also how iterative prompting works. After reviewing your first batch, identify what you want to change. Adjust one or two elements of the prompt at a time rather than rewriting it entirely. Small, deliberate changes let you understand how each modification affects the output.
In Midjourney, you can also use the “Vary (Subtle)” or “Vary (Strong)” options to produce controlled variations of a promising result.
Step 6: Refine the Image
Once you have a strong base image, use the tool’s refinement features to improve specific areas.
Inpainting: Redraw or regenerate a specific region of the image (for example, fixing a hand or adjusting a background element) while keeping the rest intact. Available in Stable Diffusion, Leonardo AI, and Adobe Firefly.
Outpainting: Extend the image beyond its original borders. Useful for adding context or changing the aspect ratio after the fact.
Prompt refinement: If a face lacks detail, add “highly detailed face, sharp focus on eyes” to your prompt. If lighting feels flat, add “rim lighting, golden hour, dramatic shadows.”
Seed locking: When a tool gives you a strong result, note the seed number. Reuse it with a slightly modified prompt to keep the same composition and character consistency.
Step 7: Upscale and Enhance
AI-generated images often start at moderate resolutions. Before using them professionally, upscale them.
Recommended upscaling approaches:
- Topaz Gigapixel AI — best-in-class for photorealistic upscaling with detail enhancement
- Real-ESRGAN — open-source upscaler, excellent for faces and textures
- Magnific AI — web-based, adds detail during upscaling
- Adobe Photoshop Super Resolution — integrated into Photoshop for Creative Cloud users
- Midjourney Upscale — the built-in upscaler within Midjourney
For most social media and web uses, a standard generation at 1024×1024 or higher is sufficient. For print or commercial advertising, upscaling to 3000px or higher is recommended.
AI Prompt Writing Framework
Use this framework every time you write a prompt. Think of it as a checklist rather than a rigid formula.
[Subject] + [Environment] + [Lighting] + [Camera & Lens] + [Composition] + [Style] + [Quality Modifiers] + [Aspect Ratio] + [Negative Prompt]
Portrait example:
“Close-up portrait of a young South Asian man in his 20s, outdoor urban background, golden hour sunlight from the left, Sony A7R IV, 85mm lens, f/1.8, shallow depth of field, photorealistic, ultra-detailed skin, hyperrealistic, –ar 4:5 | negative: cartoon, blurry, extra fingers, low quality”
Architecture example:
“Exterior of a minimalist modern villa surrounded by pine trees, late afternoon light, aerial perspective, wide angle 24mm lens, architectural photography, ultra-sharp, photorealistic, cinematic, –ar 16:9”
Food photography example:
“Overhead flat-lay of a bowl of ramen with soft-boiled egg, spring onions, and sesame seeds, natural light from a north-facing window, marble table surface, food photography, styled, 4K, ultra-detailed –ar 1:1”
Prompt Examples by Use Case
| Use Case | Example Prompt |
| Professional headshot | “Headshot of a 40-year-old professional woman in a navy blazer, plain light gray background, studio lighting, Canon 85mm, sharp focus on eyes, photorealistic” |
| E-commerce product | “Minimalist product shot of white sneakers on a light grey surface, soft studio light, side angle, commercial photography, ultra-sharp, 4K” |
| Real estate interior | “Bright modern living room with oak floors, linen sofa, large windows, afternoon light, wide-angle architectural photography, photorealistic, –ar 16:9” |
| Social media ad | “Young woman holding a green smoothie in a sunlit kitchen, lifestyle photography, candid, warm tones, bokeh background, 35mm lens, photorealistic” |
| Landscape | “Mountain lake at sunrise, pink and gold reflections, mist over the water, foreground wildflowers, landscape photography, ultra-detailed, wide-angle, RAW” |
Good Prompt vs. Poor Prompt
| Poor Prompt | Good Prompt | |
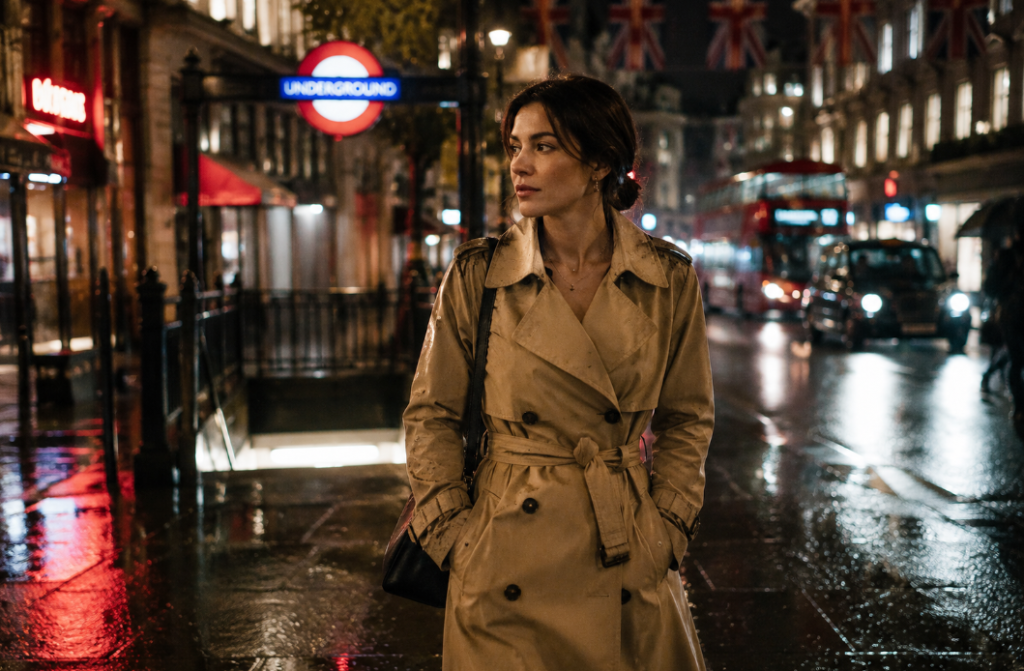
| Example | “a woman in a city” | “A 30-year-old woman in a beige trench coat walking on a rainy London street at night, reflected neon lights on wet pavement, cinematic lighting, 35mm lens, photorealistic, shallow depth of field” |
| Result | Generic, inconsistent | Specific, cinematic, highly realistic |
| Why | No camera, lighting, or style context | Every element is described with intentional visual detail |
Example Image :
Common Mistakes to Avoid
Vague prompts. “A nice photo of a dog” produces average results. Specific prompts produce specific, high-quality images.
Overloading the prompt. Including 30 different style keywords creates conflicts. Stick to five to eight key descriptors.
Ignoring lighting. Lighting is the single biggest factor in photorealism. Every strong prompt specifies how and where the light falls.
Forgetting negative prompts. Skipping negative prompts almost always results in anatomical errors and quality issues.
Wrong aspect ratio. Always set the aspect ratio to match your intended use before generating. Cropping after generation reduces quality.
Inconsistent styles. Mixing “oil painting”, “photorealistic”, and “3D render” in the same prompt produces confused outputs.
Ignoring anatomy guidance. For human subjects, include “anatomically correct hands, correct fingers, realistic proportions” to reduce common AI artifacts.
Best Practices for Consistent Results
- Start with a simple, clear prompt. Add complexity gradually.
- Iterate with small changes. Change one element at a time so you understand what each modifier does.
- Use reference image features when available (Midjourney’s –sref, Leonardo’s image-to-image). Visual references dramatically improve consistency.
- Keep prompts structured. Always follow the Subject/Environment/Lighting/Camera framework.
- Lock seeds when you get a strong result, then vary the prompt to explore the space around it.
- Save your best-performing prompts. Build a personal prompt library you can reuse and adapt.
- Experiment with aspect ratios. 3:4 works for portraits, 16:9 for landscapes and ads, 1:1 for social media.
Best AI Video Generators in 2026 (Tested: Free & Paid): Read More
Real-World Use Cases
Beginners: Use ChatGPT Images for personal projects, social media visuals, or blog thumbnails. Focus on learning the prompt framework before worrying about advanced settings.
Bloggers: Generate custom featured images for articles using Leonardo AI or Adobe Firefly. Always verify the licensing terms of the tool before publishing commercially.
Designers: Use Midjourney or FLUX to produce concept art, mood boards, and client presentation visuals. Pair with Photoshop for final retouching.
Marketing teams: Adobe Firefly integrates directly into Creative Cloud workflows. Use it for ad visuals, email headers, and landing page imagery with confidence around commercial rights.
E-commerce brands: Generate product photography mockups with Leonardo AI to reduce studio costs. Always review outputs carefully for inaccurate product representations.
Small businesses: ChatGPT Images offers the lowest barrier to entry for social media content, promotional graphics, and website visuals.
Agencies: Build repeatable prompt templates for each client brand. Use style references and seed locking to maintain visual consistency across campaigns.
Limitations to Be Aware Of
Anatomy and hands. AI models still struggle with realistic hands, finger counts, and complex poses. Always inspect these closely.
Text in images. Most models produce distorted or incorrect text. Ideogram handles this better than others, but for precise text, overlay it in post-production.
Copyright and licensing. AI-generated images exist in legal grey areas. Commercial licensing terms vary by tool. Adobe Firefly is the safest for commercial use. Always check each platform’s terms before using outputs commercially.
Hallucinations. Models sometimes generate plausible-looking but incorrect details — a logo that doesn’t exist, a sign with wrong text, a product with the wrong number of buttons.
Facial consistency. Generating the same face twice is difficult without advanced tools like LoRA fine-tuning or character reference features.
Ethics and privacy. Avoid generating realistic images of real, living people without consent. Be aware of potential misuse implications.
Hardware for local models. Running Stable Diffusion or FLUX locally requires a modern GPU with at least 8–12GB VRAM. Cloud-based tools avoid this requirement.
Expert Tips
- Use “shot on [camera model]” rather than just “DSLR.” “Shot on Sony A7 IV” yields more specific, realistic results than “professional photo.”
- Specify the time of day and direction of light. “Late afternoon sun from the left” is far more precise than “natural lighting.”
- Add emotion and micro-expressions for portraits. “Subtle smile, relaxed eyes, thoughtful expression” closes the gap between generic and believable.
- Use style references from real photography genres. Descriptions like “editorial fashion photography” or “National Geographic documentary style” invoke a coherent aesthetic.
- Vary your quality terms strategically. “Masterpiece, ultra-detailed” works in Stable Diffusion. “Photorealistic, shot on RAW” works better in Midjourney and FLUX.
- Generate at the native aspect ratio, not square. Generating a portrait at 4:5 from the start gives better composition than cropping a 1:1 image afterward.
- Use the “describe” feature (Midjourney) to reverse-engineer good prompts. Upload an image you like and let the AI describe it, then use that description as a prompt.
- Keep a changelog of your prompts. Note what changed between generations and what improved. This builds intuition faster than trial and error.
- Add film grain subtly for maximum realism. “Subtle film grain, slight lens distortion” can push a too-clean AI image closer to a genuine photograph.
- Combine inpainting with upscaling. Generate at standard resolution, inpaint problem areas, then upscale. This workflow consistently produces the cleanest final outputs.
Final Verdict
Generating realistic AI images is less about which tool you use and more about how you communicate with it. The fundamentals stay consistent across every platform: be specific, describe the light, simulate a camera, and tell the model what to avoid.
By tool type:
- Best overall photorealism: Midjourney v6
- Best for beginners: ChatGPT Images
- Best for commercial use: Adobe Firefly
- Best for technical control: FLUX / Stable Diffusion
- Best for text in images: Ideogram
- Best for creators and marketers: Leonardo AI
Best prompting strategy: Subject + Environment + Lighting + Camera + Style + Quality Modifiers + Negative Prompt. Follow this structure every time.
The field is moving quickly. Models released in late 2025 and 2026 have dramatically closed the gap between AI-generated and real photography. The tools will keep improving, but the underlying skill — knowing how to describe an image clearly and precisely — will remain valuable regardless of which model you’re using.
Start with one tool, master the prompt framework, and iterate. Within a few sessions, you’ll develop an intuitive sense of what produces results and what doesn’t. That intuition is what separates consistent, professional-quality outputs from random experimentation.
Frequently Asked Questions
What is the best AI image generator for realistic photos?
Midjourney v6 currently produces the most consistently photorealistic images for professional use. For beginners, ChatGPT Images is the most accessible. For commercial use without copyright concerns, Adobe Firefly is the safest choice.
How do I make AI images look more realistic?
Add camera-specific modifiers (lens type, focal length, camera model), specify detailed lighting conditions, include realism keywords like “RAW photo, photorealistic, ultra-detailed,” and use negative prompts to remove cartoonish or low-quality elements.
What prompt creates photorealistic images?
A photorealistic prompt includes a specific subject description, named camera and lens, lighting direction and type, a realistic setting, and modifiers like “photorealistic, hyperrealistic, shot on RAW, cinematic lighting, depth of field.” Example: “Portrait of a 28-year-old man in a grey wool coat, overcast natural light, Canon R5, 85mm f/1.4, photorealistic, ultra-detailed skin.”
Are AI-generated images copyright free?
Not automatically. Copyright rules for AI-generated images vary by country and platform. In the US, purely AI-generated images with no human creative input are generally not eligible for copyright protection. However, platform licensing terms differ significantly — always read the terms of your specific tool, especially for commercial use.
Which AI tool is best for beginners?
ChatGPT Images (built into ChatGPT) is the easiest starting point. It accepts natural language, requires no technical setup, and produces strong results with simple prompts. Adobe Firefly is also beginner-friendly and commercially safer.
How long should AI prompts be?
Effective prompts are usually 30 to 80 words. Short enough to be coherent, specific enough to guide the model. Extremely long prompts (150+ words) often produce inconsistent results because the model struggles to weight all elements equally.
Do negative prompts improve realism?
Yes, significantly. Negative prompts remove the most common AI artifacts — extra fingers, cartoonish features, blurry backgrounds, unnatural skin — and push outputs toward clean photorealism. They are especially important in Stable Diffusion and Leonardo AI.
Can AI generate realistic human faces?
Modern tools like Midjourney v6, FLUX, and Leonardo AI can generate highly convincing human faces. Hands and complex anatomy remain the most common failure points. Adding “anatomically correct, realistic proportions, detailed hands” to prompts reduces but does not eliminate these issues.
What camera settings should I include in prompts?
For the most realistic results, include: camera model (Sony A7 IV, Canon R5), lens focal length (85mm for portraits, 24mm for wide scenes), aperture (f/1.4 for bokeh, f/8 for sharp landscape), and shooting conditions (RAW, natural light, golden hour).
How do professionals create AI images?
Professional workflows typically involve: a structured prompt framework, multiple generations per concept, iterative refinement with negative prompts, inpainting to fix specific issues, upscaling with Topaz or Real-ESRGAN, and final retouching in Photoshop. Many professionals also use LoRA models in Stable Diffusion for character and style consistency.