Editing a photo the traditional way often means stacking several manual adjustments: masking a subject, matching light, adjusting color, and cleaning up edges. AI image-editing models take a different approach. You describe the change you want in plain language, and the model attempts to apply it to the image you supplied.
Microsoft MAI Image 2.7 is one of these models. It launched in preview on October 27, 2026, and Microsoft positions it as an editing model for existing images, not a tool for creating pictures from scratch. This guide explains how to access the preview, edit a photo with a text prompt, write prompts that get better results, refine the output, and fix common problems.
Microsoft MAI Image 2.7 at a Glance
| Detail | Verified information |
| Model | Microsoft MAI Image 2.7 (listed as MAI-Image-2.7-Preview on leaderboards) |
| Main purpose | AI-assisted editing of existing images using natural-language prompts |
| Announced capabilities | Restyling and relighting scenes, editing text and symbols, restoration and enhancement, and edits that depend on relationships between objects, light, and environment |
| Access options | MAI Playground, Arena, and Artificial Analysis, as listed by Microsoft |
| Text-to-image generation | Not yet available. Microsoft says it is coming later, with no date announced |
| Pricing | No published pricing at launch |
| Public API | None announced at launch |
The most important limitation is that this is a preview, and it only edits. You need an image to start with.
What Is Microsoft MAI Image 2.7?
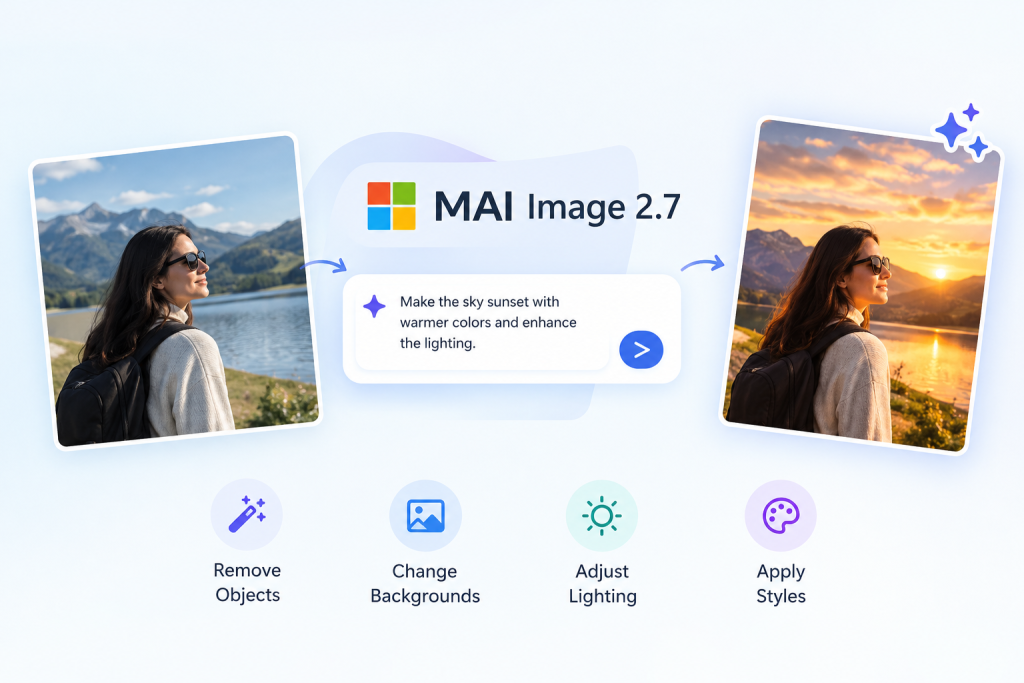
MAI Image 2.7 is the latest image model in Microsoft AI’s MAI image line. Microsoft released MAI-Image-1 in October 2025, followed by MAI-Image-2, MAI-Image-2.5, and MAI-Image-2.6 in 2026. Version 2.7 is the first in that series focused on editing without generating new images from text.
In practice, an editing model takes two inputs: a source image and a written instruction. It then returns a modified version of that image. This differs from text-to-image generation, where the model builds a picture from a description alone. Editing is useful when the composition already works and you need to change one part of it, such as the light, the background style, or a word on a sign.
Microsoft says MAI Image 2.7 improves on MAI-Image-2.6 across all 10 use cases and all seven editing actions in Artificial Analysis’s evaluation. The company reports that it leads four of those seven actions: enhancement and restoration, reasoning-based edits, scene and style, and text or symbol editing. The largest margin Microsoft cites is in scene and style, where it reports a 24-point Elo lead over the next-best model.
These are Microsoft’s claims, evaluated through Artificial Analysis’s blind human-preference tests. As of the launch reporting, the model scored 1,193 Elo on the AA-Image-Editing v2.1 leaderboard, second behind OpenAI’s GPT Image 2.5 Sunburst at 1,199. Those numbers describe how people preferred outputs in a comparison. They do not guarantee that the model will handle your photo, your prompt, or your deadline the same way.
How to Access Microsoft MAI Image 2.7
Microsoft lists three places to try the preview. Each one may work differently, so check the current interface before you plan a workflow around it.
Try MAI Playground
MAI Playground is Microsoft’s browser-based testing environment at playground.microsoft.ai. Open it, look for the MAI Image 2.7 or MAI Image editing option, and confirm that the model is selectable before you upload anything. Sign-in requirements and regional availability can change, so read any prompts the site shows you.
Try Arena or Artificial Analysis
Microsoft lists Arena and Artificial Analysis as places where the model can be tried. Both are evaluation platforms that compare models side by side. Their interfaces are built for testing and voting, not production editing, and features, access rules, or limits may differ from the Playground. Confirm that MAI Image 2.7 appears in the current version of whichever platform you use.
What You Need Before You Edit
Prepare the following before you start:
- An image you have the right to edit. If the photo shows other people, make sure you have permission to modify and publish it.
- One clear editing goal, such as adjusting the light or restyling the background.
- A written prompt that describes the change and the details to keep.
- An untouched copy of the original. Compare every result against it.
Accepted file formats, maximum file sizes, and upload steps vary by interface, so check them on the page you are using.
How to Use Microsoft MAI Image 2.7 to Edit Photos with AI Prompts
The workflow below works with any prompt-based editing interface. The exact screens will depend on where you access the model.
Step 1: Choose the Photo and One Change
Start with a sharp, well-lit source image. Blurry, heavily compressed, or very dark photos give the model less information to work with.
Pick one change for your first attempt. Good first edits include:
- Warming the light on a portrait taken in flat indoor lighting.
- Changing the background style of a product photo.
- Repairing a faded scan of a family photo.
- Updating a price or label on a promotional graphic.
Limiting the first attempt to one change makes it easier to tell what the model did.
Step 2: Open the Editing Interface and Upload the Image
Open the MAI Image 2.7 option on your chosen platform and upload your source image. If the page shows an upload area or a file picker, use it. If the page does not show a way to upload an image, the model may not be available for editing on that platform yet. Try another listed platform or check the Playground again later.
Step 3: Write a Specific Editing Prompt
A good editing prompt covers four things: the target, the change, the style, and what should stay the same. Here is an example for a portrait:
Warm up the light on the subject’s face with soft golden-hour sunlight from the left. Reduce the flat shadows under the eyes. Keep the facial features, hairstyle, clothing, and background unchanged.
The prompt names the subject, describes the lighting change, and states what must not change. Keep your prompt to a few sentences. Long prompts with many unrelated requests tend to produce mixed results.
Step 4: Review the Result Against the Original
Compare the output with your untouched source image at full size. Check these areas:
- Faces and hands: Look for changes in facial structure, expression, or finger count.
- Text and labels: Check spelling, letter shapes, and whether words are readable.
- Edges and objects: Look for halos, warped outlines, or parts of objects that merged together.
- Lighting and shadows: Shadows should point in a direction consistent with the new light.
- Unrequested changes: Look for anything else that shifted, such as color, framing, or background detail.
If the result is close but has one problem, keep it and move to the refinement step rather than starting over.
Step 5: Refine with a Targeted Follow-Up Prompt
Make one correction at a time. A follow-up prompt for the portrait might read:
Keep this image as it is, but reduce the warm color cast on the background. Leave the subject’s skin tone and lighting unchanged.
Targeted follow-ups are more reliable than rewriting the whole prompt, because the model is working from the image it already produced. Stop when the result meets your goal or when further edits make things worse. Keep the best version and discard the rest.
10 Microsoft MAI Image 2.7 Prompts for Editing Photos
The prompts below are starting points. Microsoft has not published these specific examples, and results will vary with each photo. Test each one on your own images and inspect the output using the checklist in Step 4.
1. Adjust lighting
Change the lighting to soft directional sunlight coming from the upper left. Keep the subject’s facial features, clothing, and background composition unchanged.
What to check: Whether shadows fall on the correct side and whether skin tones look natural.
2. Restyle the scene
Restyle the scene as a late-evening urban street with cool blue tones and light reflections on wet pavement. Keep the people and their positions the same.
What to check: Whether the people keep their outlines and whether the new style is applied evenly across the frame.
3. Improve a product photo
Place the product on a clean, light gray studio surface with soft, even lighting. Keep the product’s shape, proportions, colors, and label unchanged.
What to check: Edges of the product, reflections, and whether the label text stayed readable and unchanged.
4. Change the background
Replace the background with a blurred outdoor garden in soft morning light. Keep the subject’s outline, hair, and clothing unchanged.
What to check: Hair edges, fingers, and any object the subject touches. Background replacement is one of the harder tasks for any editing model.
5. Edit text on a sign or label
Change the text on the sign to read “Summer Sale 30% Off.” Keep the sign’s font style, color, and position the same.
What to check: Spelling, letter spacing, and whether the new text looks like it belongs on the surface.
6. Restore a faded photo
Restore faded colors and reduce visible dust and scratches. Preserve the original facial features, clothing, and visible details. Do not add new details that are not in the image.
What to check: Faces for over-smoothing or altered features, and whether the restored colors match the era of the photo.
7. Adjust color and mood
Give the image a muted, cinematic color grade with slightly desaturated greens and warm highlights. Keep the composition and subject unchanged.
What to check: Skin tones and whether any color shifts appear in areas you did not mention.
8. Remove or refine an object
Remove the trash bin on the left side of the sidewalk and fill the area with the matching pavement texture. Keep everything else unchanged.
What to check: Whether the filled area blends with the surroundings, with no ghosting or repeated patterns. Object removal depends on the scene, so test it on images where the background is simple.
9. Improve a marketing visual
Enhance the sharpness and contrast of this promotional image, keeping the headline text and logo exactly as they are. Make the colors more vibrant without oversaturating the skin tones.
What to check: Text and logo edges, and whether the image looks sharper without artifacts.
10. Correct a first edit
Keep this image unchanged except for the subject’s jacket. Change the jacket color to deep navy. Leave the background and lighting as they are.
What to check: Whether only the jacket changed. Use a follow-up like this after a first pass that got most of the way there.
How to Write Better AI Photo-Editing Prompts
Vague prompts produce unpredictable results. Compare these two:
Weak: Make this photo look better.
Specific: Brighten the subject’s face with soft natural light, reduce harsh shadows, preserve natural skin texture, and keep the background and framing unchanged.
The specific version tells the model what to change, how the change should look, and what must stay fixed. A reliable prompt framework has four parts:
- Target: Name the subject, object, or area you want to edit.
- Action: State the exact change, using a verb such as brighten, replace, restore, or remove.
- Style: Describe the lighting, color, texture, or atmosphere you want.
- Preservation: List what should stay unchanged, such as facial features, text, product shape, or framing.
Preservation instructions help, but they do not guarantee that the model will keep every detail intact. Always inspect faces, text, and object shapes in the output.
Use specific nouns. “The woman’s left hand” is clearer than “the hand.” Use measurable or visual language where possible: “soft shadow,” “warm 3,000K light,” or “matte finish” give the model more to work with than “nice.” Avoid asking for several unrelated changes in one prompt. If you need five changes, make them in sequence.
What Can You Edit with MAI Image 2.7?
Microsoft’s announced capabilities fall into the categories below. The right-hand column shows example uses, which are editorial suggestions rather than separate claims by Microsoft.
| Editing task | Example application |
| Scene restyling | Shifting the visual style of a campaign photo |
| Relighting | Changing the direction or mood of light in a product shot |
| Text and symbol editing | Updating a word or icon inside an existing graphic |
| Restoration and enhancement | Improving a faded or damaged scanned photo |
| Edits that depend on scene relationships | Adjusting an object so its reflections and shadows match the new light |
Microsoft’s announcement covers these capabilities. Narrower tasks, such as swapping a specific background or removing a particular object, are reasonable to test, but Microsoft has not guaranteed them for every image. Confirm results on your own photos before relying on them.
Common MAI Image 2.7 Editing Problems and How to Fix Them
| Problem | Likely cause | Fix |
| The model changes more than you asked | The prompt lacked a preservation instruction | Add “keep everything else unchanged” and list the elements to preserve |
| A face or object looks different | Editing pressure on a feature the prompt did not protect | Name the feature explicitly, reduce the scope of the change, or split the edit into steps |
| Text is misspelled or distorted | Text generation is harder than general editing | Keep the requested words short, specify the exact text in quotes, and fix any remaining errors in a separate editing tool |
| Lighting looks artificial | The light direction or intensity was too strong | Specify the direction, intensity, and color temperature in the prompt, then use a smaller follow-up adjustment |
| The intended area was not edited | The target was described too loosely | Use a precise location, such as “the sign above the door on the left” |
| The model is not visible in your interface | Preview availability varies by platform and region | Try another listed platform, check the Playground’s model list, or wait for broader availability |
If you cannot find a feature or option that a tutorial describes, the interface may have changed. Trust what the page shows you over older instructions.
Best Practices for Better AI Image Editing Results
Start with one clear objective for each session. A single goal, such as “brighten the portrait,” gives you a clear way to judge success.
Keep an untouched original so you can compare the result against it. Save each output with a descriptive file name so you can return to a version that worked.
Refine one issue at a time. If a result has three problems, prompt for one fix, review, and then prompt for the next. This makes it easier to see which change caused any new problem.
Inspect faces, hands, text, logos, fine details, shadows, and object edges before using an output. These are the areas where editing models most often produce visible errors.
Get permission before editing or publishing photos of other people. Also check the terms of the platform you use and any rules that apply to your business before using edited images in advertising, e-commerce listings, or professional communications. Microsoft’s launch materials do not cover commercial-use rights for outputs, so confirm those terms directly with Microsoft before relying on them.
Plan for human review. Edited images can contain subtle errors that are easy to miss at thumbnail size. For anything published under your name or a brand’s name, look at the full-resolution file.
Is Microsoft MAI Image 2.7 Worth Trying?
MAI Image 2.7 is worth testing if you regularly work with existing images and want to see how a high-ranking editing model handles your type of content. Microsoft’s announced strengths suit several groups:
- Beginners who want to experiment with prompt-based editing without learning complex software.
- Content creators who adjust lighting, color, or style on existing visuals.
- Marketing teams exploring scene restyling and relighting for campaign assets.
- Product marketers looking at ways to refresh the look of existing product photos.
Whether it fits your work depends on access, output quality on your specific images, and how much manual correction you need. Because the model is in preview, has no published pricing, and has no announced public API, it is better suited to testing and creative exploration than to production pipelines that need guaranteed uptime or a stable interface.
If you are comparing editing tools, run the same five or six real edits through each one and judge the results yourself. Leaderboard positions measure human preference in blind comparisons. They do not measure how a tool fits your workflow.
Conclusion
Microsoft MAI Image 2.7 is a preview model built for prompt-based editing of existing images. Its announced strengths are relighting, scene restyling, text and symbol editing, and restoration. Microsoft reports that it leads several editing categories on Artificial Analysis’s evaluation, though those results reflect human preferences in comparisons, not guaranteed results on your photos.
The workflow is simple. Choose an existing image, describe one specific change, name the details that must stay the same, review the output closely, and refine with a targeted follow-up. Start with a single edit so you can see what the model does well and where it needs help.
To begin, open MAI Playground at playground.microsoft.ai, confirm that the MAI Image 2.7 option is available, and test it on an image you have the right to edit.
Frequently Asked Questions
What is Microsoft MAI Image 2.7?
Microsoft MAI Image 2.7 is an AI image-editing model from Microsoft AI. It is in preview and edits existing images based on written prompts, including restyling, relighting, text editing, and restoration.
How do you use Microsoft MAI Image 2.7 to edit photos?
Open a platform that offers the model, upload an existing image, write a prompt that names the change and the details to keep, review the result, and refine it with a targeted follow-up prompt.
Where can I access MAI Image 2.7?
Microsoft lists MAI Playground, Arena, and Artificial Analysis as places to try the preview. Confirm the model is available on each platform before you start.
Is Microsoft MAI Image 2.7 free to use?
Microsoft has not published pricing for MAI Image 2.7 as of the launch reporting. Check the Playground and Microsoft’s official announcements for current access terms before assuming any level of cost.
Can MAI Image 2.7 edit existing photos with prompts?
Yes. Editing existing images is the model’s launch focus. Text-to-image generation is planned for later and is not available in the preview.
Can MAI Image 2.7 change photo backgrounds and lighting?
Microsoft’s announcement highlights relighting and scene restyling, which cover many lighting and background changes. Background replacement is harder to guarantee for every photo, so test it on your own images and inspect the edges.
Can MAI Image 2.7 preserve faces and text during editing?
Preservation instructions can help, but no editing model guarantees that faces, text, or object shapes stay exactly the same. Check these elements carefully in every output.
Is MAI Image 2.7 available through an API?
Not at launch. Microsoft has not announced a public API for MAI Image 2.7. Earlier MAI image models have been offered through Microsoft Foundry, but that does not confirm an API for this preview.